Wiki mirrorView source
The information in this page is updated in accordance with firmware version RUT2M_R_00.07.22.1.
Summary
Virtual Private Network (VPN) is a method of connecting multiple private networks across the Internet. VPNs can serve to achieve many different goals, but some of its main purposes are:
- access between remote private networks;
- data encryption;
- anonymity when browsing the Internet.
This page is an overview of the different types of VPNs supported by RUT200 devices.
OpenVPN
OpenVPN is an open-source software application that implements virtual private network (VPN) techniques for creating secure point-to-point or site-to-site connections in routed or bridged configurations and remote access facilities. It is often regarded as being the most universal VPN protocol because of its flexibility, support of SSL/TLS security, multiple encryption methods, many networking features and compatibility with most OS platforms.
Note: OpenVPN DCO kernel module moved to package manager on some devices. Please visit System → Package Manager page.
OpenVPN Client
An OpenVPN client is an entity that initiates a connection to an OpenVPN server.
| Client status | Value | Description |
|---|---|---|
| Export | -(interactive button) | Exports the instance configuration to .ovpn file. |
| Edit | -(interactive button) | Opens the instance configuration window. |
| Delete | -(interactive button) | Removes an instance. |
To begin configuration, click 'Add' button, select Role: Client. Refer to the figure and table below for information on the OpenVPN client's configuration fields:
| General section | Value | Description |
|---|---|---|
| Enable configuration | off | on; default: off | Enable current configuration. |
| Role | Client | Server; default: Client | Choose a role for OpenVPN isntance. |
| Name | string; default: instance1 | Name of the OpenVPN instance. |
| Configuration type | Manual | Upload config file | External services; default: Manual | Choose configuration type. |
| VPN providers | Express VPN | Nord VPN; default: Nord VPN | Represents a list of available VPN providers. |
| VPN servers | United Kingdom | USA | Australia | South Africa | Custom; default: United Kingdom | Represents a list of available VPN servers. |
| Username | string; default: none | Username used for authentication to the VPN server. |
| Password | string; default: none | Password used for authentication to the VPN server. |
| Enable parsing | off | on; default: off | By enabling parsing, you can modify the configuration in the future. |
| OpenVPN configuration file | -(interactive button) | Upload OpenVPN configuration. Warning! This will overwrite your current configuration. |
| Authentication | TLS | TLS/Password | Password | Static key; default: TLS | Choose a method to authenticate your OpenVPN network. |
| TUN/TAP | TUN (tunnel) | TAP (bridged); default: TUN (tunnel) | Virtual VPN interface type. |
| Topology | NET30 | P2P | SUBNET (not shown with Static key); default: NET30 | Virtual addressing topology determines how IP addressing and routing are handled between the server and clients. |
| Protocol | UDP | TCP | UDP4 | TCP4 | UDP6 | TCP6; default: UDP | The transport protocol used for the connection. Note: UDP and TCP do not support IPv6 connections, use UDP6 or TCP6 instead. |
| Port | integer [0..65535]; default: 1194 | TCP/UDP port for both local and remote endpoints. Make sure that this port is open in the firewall. |
| Extra options | string; default: none | Enter any additional options to be added to the OpenVPN configuration. If an option is already in use, the new option will take precedence. |
| Network section | Value | Description |
|---|---|---|
| Static key: Local tunnel endpoint IP | ip; default: none | IP address of the virtual local network interface. |
| Static key: Remote tunnel endpoint IP | ip; default: none | IP address of the virtual remote network interface. |
| Remote host/IP address | ip; default: none | IP address or domain name of the OpenVPN server. |
| Remote network | ip4; default: none | IP address of the remote LAN. |
| TAP (bridged): Bridge | lan | none; default: lan | Assign a TAP interface to a bridge.. |
| Static key: Local tunnel endpoint IPv6 | ip; default: none | IPv6 address of the virtual local network interface. |
| Static key: Remote tunnel endpoint IPv6 | ip; default: none | IPv6 address of the virtual remote network interface. |
| LZO | None | Adaptive | Yes | No; default: None | Use fast LZO compression. With LZO compression, your VPN connection will generate less network traffic. |
| Resolve retry | integer | infinite; default: infinite | Try to resolve the server hostname for X seconds before giving up. |
| Keep alive | two integers separated by a space; default: none | Try to keep the connection alive. Two values are required: ping_interval and ping_restart, e.g., 10 120. |
| Security section | Value | Description |
|---|---|---|
| TLS/Password/Password: User name | string; default: none | VPN client username. |
| TLS/Password/Password: Password | string; default: none | VPN client password. |
| Encryption | DES-CBC 64 | RC2-CBC 128 | DES-EDE-CBC 128 | DES-EDE3-CBC 192 | DESX-CBC 192 | BF-CBC 128 | RC2-40-CBC 40 | CAST5-CBC 128 | RC2-64CBC 64 | AES-128-CBC 128 | AES-128-CFB 128 | AES-128-CFB1 128 | AES-128-CFB8 128 | AES-128-OFB 128 | AES-128-GCM 128 | AES-192-CBC 192 | AES-192-CFB 192 | AES-192-CFB1 192 | AES-192-CFB8 192 | AES-192-OFB 192 | AES-192-GCM 192 | AES-256-CBC 256 | AES-256-CFB 256 | AES-256-CFB1 256 | AES-256-CFB8 256 | AES-256-OFB 256 | AES-256-GCM 256 | none; default: AES-256-CBC 256 | Packet encryption algorithm (cipher). |
| Data ciphers | depends on authentication; default: AES-256-CBC | Select allowed data ciphers from the list; add a custom value if needed. |
| Authentication algorithm | none | MD5 | SHA1 | SHA256 | SHA384 | SHA512; default: SHA1 | HMAC authentication algorithm type. |
| TLS/TLS/Password/Password:Additional HMAC authentication | None | Authentication only (tls-auth) | Authentication only (tls-auth); default: None | Add an additional layer of HMAC authentication on top of the TLS control channel to protect against DoS attacks. |
| TLS/TLS/Password/Password: HMAC key direction | 0 | 1; default: 1 | The HMAC authentication key direction value is arbitrary and must be opposite between communicating parties (or omitted entirely). |
| Certificates section | Value | Description |
|---|---|---|
| TLS/TLS/Password/Password:Use PKCS #12 format | off | on; default: off | Use PKCS #12 archive file format to bundle all the members of a chain of trust. |
| TLS/TLS/Password/Password: PKCS #12 certificate chain | -(interactive button) | Uploads a PKCS #12 certificate chain file. |
| TLS/TLS/Password/Password: PKCS #12 passphrase | string; default: none | Passphrase to decrypt PKCS #12 certificates. |
| TLS/TLS/Password/Password: Certificate files from device | off | on; default: off | Choose this option if you want to select certificate files from the device. |
| TLS/TLS/Password/Password: Store client key in TPM | off | on; default: on | When enabled, key will be stored in TPM2 secure storage if space is available. Note: this option is only available on devices with TPM support. |
| TLS/TLS/Password/Password: Certificate authority | .ca file; default: none | The digital certificate verifies the ownership of a public key by the named subject of the certificate. |
| TLS/TLS/Password: Client certificate | .crt file; default: none | Identify a client or a user, authenticating the client to the server and establishing precisely who they are. |
| TLS/TLS/Password: Client key | .key file; default: none | It has been generated for the same purpose as a client certificate. |
| TLS/TLS/Password: Private key decryption password (optional) | string; default: none | Decrypt private key with password (Optional). |
| Static key: Static pre-shared key | .key file; default: none | A pre-shared key (PSK) is a shared secret that was previously shared between two parties using some secure channel before it needs to be used. |
Additional notes:
- Some configuration fields become available only when certain other parameters are selected. The names of the parameters are followed by a prefix that specifies the authentication type under which they become visible. Different color codes are used for different prefixes:
- Red for Authentication: TLS
- Olive for Authentication: TLS/Password
- Purple for Authentication: Static key
- Blue for Authentication: Password
- Brown for OpenVPN config from file
- After changing any of the parameters, don't forget to click the Save & Apply button located at the bottom-right side of the page.
OpenVPN Server
An OpenVPN server is an entity that waits for incoming connections from OpenVPN clients. Only one OpenVPN server instance is allowed to be added.
A server needs to have a public IP address in order to be available from the public network (the Internet).
| Server status | Value | Description |
|---|---|---|
| Export | -(interactive button) | Exports the instance configuration to .ovpn file. |
| Generate client configuration* | -(interactive button) | Redirects to "Generate client configuration" window. |
| Edit | -(interactive button) | Opens the instance configuration window. |
| Delete | -(interactive button) | Removes an instance. |
*Generate client configuration window:
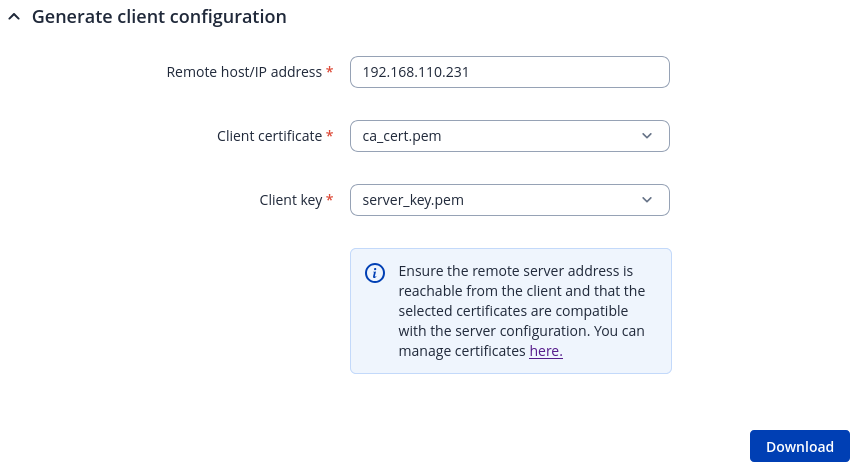
| Server status | Value | Description |
|---|---|---|
| Remote host/IP address | IP | IP address or domain name of the OpenVPN server. |
| Client certificate | .crt file | The certificate will be added to the generated client configuration file. |
| Client key | .key file | The private key will be added to the generated client configuration file. |
| Download | -(interactive button) | Downloads the client configuration to .ovpn file. |
To begin configuration, click 'Add' button, select Role: Server. Refer to the figure and table below for information on the OpenVPN server's configuration fields:
| General section | Value | Description |
|---|---|---|
| Enable configuration | off | on; default: off | Enable current configuration. |
| Role | Client | Server; default: Server | Choose a role for OpenVPN isntance. |
| Name | string; default: instance1 | Name of the OpenVPN instance. |
| Configuration type | Manual | Upload config file; default: Manual | Choose configuration type. |
| Enable parsing | off | on; default: off | By enabling parsing, you can modify the configuration in the future. |
| OpenVPN configuration file | -(interactive button) | Upload OpenVPN configuration. Warning! This will overwrite your current configuration. |
| Authentication | TLS | TLS/Password | Password | Static key; default: TLS | Choose a method to authenticate your OpenVPN network. |
| TUN/TAP | TUN (tunnel) | TAP (bridged); default: TUN (tunnel) | Virtual VPN interface type. |
| Topology | NET30 | P2P | SUBNET (not shown with Static key); default: NET30 | Virtual addressing topology determines how IP addressing and routing are handled between the server and clients. |
| Protocol | UDP | TCP | UDP4 | TCP4 | UDP6 | TCP6; default: UDP | The transport protocol used for the connection. Note: UDP and TCP do not support IPv6 connections, use UDP6 or TCP6 instead. |
| Port | integer [0..65535]; default: 1194 | TCP/UDP port for both local and remote endpoints. Make sure that this port is open in the firewall. |
| Push option (not shown with Static key) | string; default: none | Push a configuration option back to the client for remote execution. |
| Extra options | string; default: none | Enter any additional options to be added to the OpenVPN configuration. If an option is already in use, the new option will take precedence. |
| Network section | Value | Description |
|---|---|---|
| TLS/TLS/Password/Password: Virtual network IP address | ip4; default: none | IP address used for the virtual network. |
| TLS/TLS/Password/Password: Virtual network netmask | netmask; default: none | Subnet mask used for the virtual network. |
| Static key: Local tunnel endpoint IP | ip; default: none | IP address of the virtual local network interface. |
| Static key: Remote tunnel endpoint IP | ip; default: none | IP address of the virtual remote network interface. |
| TLS/TLS/Password/Password: Assign IP start | IP; default: none | Assign IP addresses starting from a pool of subnets to be dynamically allocated to connecting clients. |
| TLS/TLS/Password/Password: Assign IP end | IP; default: none | Assign IP addresses ending at a pool of subnets to be dynamically allocated to connecting clients. |
| TLS/TLS/Password/Password: Virtual network IPv6 address | ip6; default: none | IPv6 address used for the virtual network. |
| TLS/TLS/Password/Password: Assign IPv6 address | ip6; default: none | Specify an IPv6 address pool for dynamic assignment to clients. |
| Static key: Local tunnel endpoint IPv6 | ip; default: none | IPv6 address of the virtual local network interface. |
| Static key: Remote tunnel endpoint IPv6 | ip; default: none | IPv6 address of the virtual remote network interface. |
| TAP (bridged): Bridge | lan interface | none; default: lan | Assign a TAP interface to a bridge. |
| TAP (bridged): Gateway IP address | IPv4; default: none | IP address and netmask of the bridge interface on the VPN server. This address is assigned to the TAP interface and advertised to VPN clients as their gateway. |
| LZO | None | Adaptive | Yes | No; default: None | Use fast LZO compression. With LZO compression, your VPN connection will generate less network traffic. |
| Client to client | off | on; default: off | Allow client-to-client traffic. |
| Resolve retry | integer | infinite; default: infinite | Try to resolve the server hostname for X seconds before giving up. |
| Keep alive | two integers separated by a space; default: none | Try to keep the connection alive. Two values are required: ping_interval and ping_restart, e.g., 10 120. |
| Security section | Value | Description |
|---|---|---|
| TLS/Password/Password: Usernames & Passwords | -(interactive button) | File containing usernames and passwords against which the server can authenticate clients. Each username and password pair should be placed on a single line and separated by a space. |
| Encryption | DES-CBC 64 | RC2-CBC 128 | DES-EDE-CBC 128 | DES-EDE3-CBC 192 | DESX-CBC 192 | BF-CBC 128 | RC2-40-CBC 40 | CAST5-CBC 128 | RC2-64CBC 64 | AES-128-CBC 128 | AES-128-CFB 128 | AES-128-CFB1 128 | AES-128-CFB8 128 | AES-128-OFB 128 | AES-128-GCM 128 | AES-192-CBC 192 | AES-192-CFB 192 | AES-192-CFB1 192 | AES-192-CFB8 192 | AES-192-OFB 192 | AES-192-GCM 192 | AES-256-CBC 256 | AES-256-CFB 256 | AES-256-CFB1 256 | AES-256-CFB8 256 | AES-256-OFB 256 | AES-256-GCM 256 | none; default: AES-256-CBC 256 | Packet encryption algorithm (cipher). |
| Data ciphers | depends on authentication; default: AES-256-CBC | Select allowed data ciphers from the list; add a custom value if needed. |
| TLS/TLS/Password/Password: Allow duplicate certificates | off | on; default: off | All clients can have the same certificates. |
| Authentication algorithm | none | MD5 | SHA1 | SHA256 | SHA384 | SHA512; default: SHA1 | HMAC authentication algorithm type. |
| TLS/TLS/Password/Password:Additional HMAC authentication | None | Authentication only (tls-auth) | Authentication only (tls-auth); default: None | Add an additional layer of HMAC authentication on top of the TLS control channel to protect against DoS attacks. |
| TLS/TLS/Password/Password: HMAC key direction | 0 | 1; default: 1 | The HMAC authentication key direction value is arbitrary and must be opposite between communicating parties (or omitted entirely). |
| Certificates section | Value | Description |
|---|---|---|
| TLS/TLS/Password/Password:Use PKCS #12 format | off | on; default: off | Use PKCS #12 archive file format to bundle all the members of a chain of trust. |
| TLS/TLS/Password/Password: PKCS #12 certificate chain | -(interactive button) | Uploads a PKCS #12 certificate chain file. |
| TLS/TLS/Password/Password: Certificate files from device | off | on; default: off | Choose this option if you want to select certificate files from the device. |
| TLS/TLS/Password/Password: Store server key in TPM | off | on; default: on | When enabled, key will be stored in TPM2 secure storage if space is available. Note: this option is only available on devices with TPM support. |
| TLS/TLS/Password/Password: Certificate authority | .ca file; default: none | The digital certificate verifies the ownership of a public key by the named subject of the certificate. |
| TLS/TLS/Password/Password: Server certificate | .crt file; default: none | Certificate servers validate or certify keys as part of a public key infrastructure. |
| TLS/TLS/Password/Password: Server key | .key file; default: none | It has been generated for the same purpose as the server certificate. |
| TLS/TLS/Password/Password: Diffie Hellman parameters | .pem file; default: none | Diffie-Hellman key exchange is a specific method of exchanging cryptographic keys. |
| TLS/TLS/Password/Password: CRL file (optional) | .pem file | .crl file; Default: none | Revoking a certificate means to invalidate a previously signed certificate so that it can no longer be used for authentication purposes. Upload a .pem revocation file. |
| TLS/TLS/Password/Password: PKCS #12 passphrase | string; default: none | Passphrase to decrypt PKCS #12 certificates. |
| TLS/TLS/Password/Password: Private key decryption password (optional) | string; default: none | Decrypt private key with password (Optional). |
| Static key: Static pre-shared key | -(interactive button) | A pre-shared key (PSK) is a shared secret that was previously shared between two parties using some secure channel before it needs to be used. |
Additional notes:
- Some configuration fields become available only when certain other parameters are selected. The names of the parameters are followed by a prefix that specifies the authentication type under which they become visible. Different color codes are used for different prefixes:
- Red for Authentication: TLS
- Olive for Authentication: TLS/Passwords
- Purple for Authentication: Static key
- Blue for Authentication: Password
- Brown for OpenVPN config from file
- After changing any of the parameters, don't forget to click the Save & Apply button located at the bottom-right side of the page.
TLS Clients
TLS Clients is a way to differentiate clients by their Common Names (CN), which are found in the client certificate file. It can be used to assign specific VPN addresses to corresponding clients and bind them to their LAN addresses, making the server aware of which client has which LAN IP address.
The TLS Clients section can be found in the OpenVPN Server configuration window, provided that the OpenVPN server uses TLS or TLS/Password authentication methods. To create a new TLS client, type in the new client‘s name in the text field found bellow the TLS Clients tab and click the 'Add' button. Refer to the figure and table below for information on the TLS Clients' configuration fields:
| Field | Value | Description |
|---|---|---|
| Common name (CN) | string; default: none | Client certificate CN field (e.g.,s [email protected]). |
| Virtual local subnet | IPv4 with subnet; default: none | IP address and subnet mask for the client's virtual local interface. |
| Virtual local endpoint | ip; default: none | Client’s local address in the virtual network. |
| Virtual remote endpoint | ip; default: none | Client’s remote address in the virtual network. |
| Local tunnel endpoint IPv6 | ip; default: none | IPv6 address of virtual local network interface. |
| Private network IPv6 | ip; default: none | Client’s private network (LAN) IPv6 address. |
| Private network | ip; default: none | Client’s private network (LAN) IP address. |
| Covered Network | network(); default: none | Selects which networks should be made accessible to this client. |
OpenVPN Server Brute-force Prevention
OpenVPN Servers with Authentication set to TLS/Password or Password, Protocol set to UDP and running on Port 1194 have a feature where after a client attempts to connect to the server 10 times with incorrect credentials (password and/or username) they are then blocked from the server.
To check which addresses are blocked one first needs to connect to their device's CLI.
After connecting to your device's CLI use the command ipset list and find the section named ipb_port. There under Members you should see all IP addresses that are blocked.
Name: ipb_port
Type: hash:ip,port
Revision: 5
Header: family inet hashsize 1024 maxelem 65536
Size in memory: 164
References: 2
Number of entries: 1
Members:
188.XXX.XXX.XXX,udp:1194
Another way to check blocked IP addresses is to use the command ubus call ip_block show. This will show all ip addresses that failed to connect to your device. If the counter atribute of the IP address entry is larger or equal then max_attempt_count then that IP address is blocked.
{
	"globals": {
		"max_attempt_count": 10
	},
	"ip_blockd 188.XXX.XXX.XXX": {
		"ip": "188.XXX.XXX.XXX",
		"port": "udp:1194",
		"counter": "1"
	},
	"ip_blockd 188.XXX.XXX.XXX": {
		"ip": "188.XXX.XXX.XXX",
		"port": "udp:1194",
		"counter": "10"
	}
}
To unblock a blocked client's IP address use the command ubus call ip_block unblock '{"ip":"<blocked_ip_address>","port":"udp:1194"} (replace <blocked_ip_address> inside the quotes with your blocked IP address). If the IP address was unblocked succesfully you should see a similar response:
{
	"unblocked": {
		"ip": "188.XXX.XXX.XXX",
		"port": "udp:1194"
	}
}
GRE
Generic Routing Encapsulation (GRE) is a tunneling protocol used to establish point-to-point connections between remote private networks. GRE tunnels encapsulate data packets in order to route other protocols over IP networks.
GRE: Main & Tunnel Settings
To create a new GRE instance, go to the Services → VPN → GRE section, enter a custom name and click the 'Add' button. A GRE instance with the given name will appear in the "GRE Configuration" list.
To begin configuration, click the button that looks like a pencil located next to the instance. Refer to the figure and table below for information on the fields located in the GRE instance configuration section.
| Field | Value | Description |
|---|---|---|
| Enabled | off | on; default: off | Turns the GRE instance on or off. |
| IPv6 | off | on; default: off | Use IPv4 or IPv6 for the GRE tunnel. |
| Tunnel source | network interface; default: - | Network interface used to establish the GRE Tunnel. |
| Remote endpoint IP address | ipv4/ipv6; default: none | External IP address of another GRE instance used to establish the initial connection between peers. |
| MTU | integer; default: 1476 | Sets the maximum transmission unit (MTU) size. It is the largest size of a protocol data unit (PDU) that can be transmitted in a single network layer transaction. |
| Outbound key | integer [0..4294967295]; default: none | Key for outgoing packets. This value should match the 'Inbound key' value set on the opposite GRE instance or both key values should be omitted on both sides. |
| Inbound key | integer [0..4294967295]; default: none | Key for incoming packets. This value should match the 'Outbound key' value set on the opposite GRE instance or both key values should be omitted on both sides. |
| Path MTU Discovery | off | on; default: off | When unchecked, sets the nopmtudisc option for tunnel. Can not be used together with the TTL option. |
| TTL | integer [0..255]; default: 255 | Sets a custom TTL (Time to Live) value for encapsulated packets. TTL is a field in the IP packet header which is initially set by the sender and decreased by 1 on each hop. When it reaches 0 it is dropped and the last host to receive the packet sends an ICMP "Time Exceeded" message back to the source. |
| Keep alive | off | on; default: off | The 'keep alive' feature sends packets to the remote instance in order to determine the health of the connection. If no response is received for [Keep alive retries] times, the device will mark the tunnel as DOWN. |
| Keep alive interval | integer [1..255]; default: 20 | Frequency (in seconds) at which 'keep alive' packets are sent to the remote instance. |
| Keep alive retries | integer [1..255]; default: 3 | Amount of keep alive packets to lose before marking tunnel as DOWN. |
| Local GRE interface IP address | ipv4; default: none | IP address of the local GRE Tunnel network interface. |
| Local GRE interface netmask | netmask; default: none | Subnet mask of the local GRE Tunnel network interface. |
| Local GRE interface IPv6 address | ipv6; default: none | IPv6 address of the local GRE Tunnel instance. |
GRE: Routing Settings
Routing settings are used to configure routes to networks that are behind the device that hosts the opposite GRE instance. To add a new route, simply click the 'Add' button. For information on configuring the route refer to the figure and table below.
| IPv4 routing settings | Value | Description | IPv6 routing settings | Value | Description |
|---|---|---|---|---|---|
| Remote subnet IPv4 address | ipv4; default: none | LAN IPv4 address of the device that hosts the remote GRE Tunnel instance. | |||
| Remote subnet netmask | netmask; default: none | Subnet mask of the network behind the device that hosts the remote GRE instance. | |||
| Actions | -(interactive button) | Removes configuration. | |||
| Remote subnet IPv6 address | ipv6; default: none | LAN IPv6 address of the device that hosts the remote GRE Tunnel instance. | |||
| Actions | -(interactive button) | Removes configuration. |
IPsec
To create a new IPsec instance, go to the Services → VPN → IPsec section, enter a custom name and click the 'Add' button. An IPsec instance with the given name will appear in the "IPsec Configuration" list.
IPsec Instance
The general settings section is used to configure the main IPsec parameters. Refer to the figure and table below for information on the configuration fields located in the general settings section.
| Field | Value | Description |
|---|---|---|
| Enable | off | on; default: off | Turns the IPsec instance on or off. |
| Remote endpoint | host | ip; default: none | Domain names, ip addresses (with or without network mask), %any, %any4, %any6 values are accepted (e.g., 192.168.1.1 or example.com). |
| Key exchange | IKEv1 | IKEv2; default: IKEv1 | Internet Key Exchange (IKE) version used for key exchange.
|
| Authentication method | Pre-shared key | X.509 | EAP | PKCS#12; default: Pre-shared key | Specify authentication method. Choose between Pre-shared key and X.509 certificates. |
| PKCS#12: PKCS12 container | -(interactive button) | Upload PKCS12 container file. |
| PKCS#12: PKCS12 decryption passphrase | string; default: none | Passphrase to decrypt PKCS12 container. |
| Pre-shared key: Pre shared key | string; default: none | A shared password used for authentication between IPsec peers before a secure channel is established. |
| X.509: | EAP: Certificate files from device | off | on; default: off | Choose this option if you want to select certificate files from device. Certificate files can be generated here |
| X.509: | EAP: Store keys in TPM | off | on; default: on | When enabled, key will be stored in TPM2 secure storage if space is available. Note: this option is only available on devices with TPM support and works with IKEv2 (key exchange). |
| X.509: | EAP: Key | A private key file; default: none | A private key file. |
| X.509: | EAP: Key decryption passphrase | A password for private key files; default: none | If the private key file is encrypted, the passphrase must be defined. |
| X.509: | EAP: Local Certificate | .der file; default: none | A local certificate file. |
| X.509: | EAP: CA Certificate | .der file; default: none | A certificate authority file. |
| Local identifier | ip | string; default: none | Defines how the user (left participant) will be identified during authentication. Maximum length of value is 255.
|
| Remote identifier | ip | string; default: none | Defines how the right participant will be identified during authentication. Maximum length of value is 255.
|
| Multiple secrets | off | on; default: off | Enable to show Global Secret Settings section for configuring multiple secrets. |
Additional notes:
- Some configuration fields become available only when certain other parameters are selected. The names of the parameters are followed by a prefix that specifies the authentication type under which they become visible. Different color codes are used for different prefixes:
- Chocolate for Authentication method: Pre-shared key
- Dark red for Authentication method: X.509/EAP
- Blue for Authentication method: PKCS#12
Global Secrets Settings
This section is displayed when Multiple secrets is enabled in General settings. You can add new instances by pressing Add.
| Field | Value | Description |
|---|---|---|
| ID Selector | %any, IP or FQDN; default: none | Each secret can be preceded by a list of optional ID selectors. A selector is an IP address, a Fully Qualified Domain Name, user@FQDN or %any. When using IKEv1 use IP address. Maximum length of value is 255. NOTE: IKEv1 only supports IP address ID selector. |
| Type | PSK | XAUTH | EAP | RSA | PKCS#12; default: PSK | Make sure to turn on the "Enable XAUTH" option in connection settings, if you want to use XAUTH type secrets. |
| Secret | string; default: none | A shared password (or EAP key file) to authenticate between the peers. Minimum length is 5 symbols. All characters are allowed except `. |
| RSA | PKCS#12: Secret | Private key file; default: none | A private key file. |
| RSA | PKCS#12: Key decryption passphrase | A password for private key files; default: none | If the private key file is encrypted, the passphrase must be defined. |
| Actions | -(interactive button) | Deletes global secret. |
IPsec Instance: Connection Configuration
The connection settings section is used to configure the main parameters of an IPsec connection. Refer to the figure and table below for information on the configuration fields located in the connection settings section.
General Settings
| Field | Value | Description |
|---|---|---|
| Mode | Start | Add | Route; default: Start | Specifies which operation will be done automatically at IPSec startup. |
| Type | Tunnel | Transport; default: Tunnel | Type of connection.
|
| Tunnel: Default route | off | on; default: off | Turn on to route all traffic through IPSec tunnel. |
| Tunnel: Route based IPsec | off | on; default: off | IPsec VPN tunnel created between two end points. |
| Tunnel: IP address | IP adress; default: none | Assign an IP address to XFRM interface. |
| Tunnel: MTU | integer [68..9200]; default: none | Sets the maximum transmission unit (MTU) size. It is the largest size of a protocol data unit (PDU) that can be transmitted in a single network layer transaction. |
| Tunnel: Local subnet | ip/netmask | default: none | Private subnet behind the left (local) participant, expressed as network/netmask. IKEv2 supports multiple subnets, IKEv1 only interprets the first subnet. |
| Tunnel: Remote subnet | ip/netmask; default: none | Private subnet behind the right (remote) participant, expressed as network/netmask. IKEv2 supports multiple subnets, IKEv1 only interprets the first subnet. |
| Transport: Bind to | GRE interface; L2TP interface; default: none | Bind to GRE or L2TP interface to create GRE/L2TP over IPsec. |
| Enable XAuth | on | off; default: off | Enables Extended Authentication. |
Additional notes:
- Some configuration fields become available only when certain other parameters are selected. The names of the parameters are followed by a prefix that specifies the authentication type under which they become visible. Different color codes are used for different prefixes:
- Red for Type: Tunnel
- Purple for Type: Transport
Advanced settings
| Field | Value | Description |
|---|---|---|
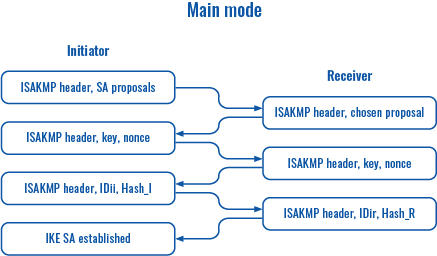
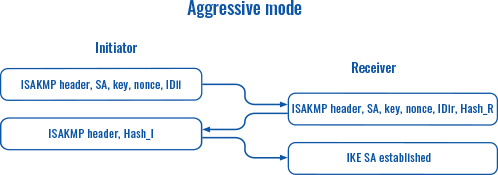
| Aggressive | off | on; default: off | Turn aggressive mode on or off for outgoing connections. Aggressive mode performs fewer exchanges (a total of 4 messages) than Main mode (a total of 6 messages) by storing most data into the first exchange. In aggressive mode, the information is exchanged before there is a secure channel, making it less secure but faster than main mode. Aggressive mode is available only with IKEv1; if IKEv2 is selected this field becomes hidden. |
| Force encapsulation | off | on; default: off | Forces UDP encapsulation for ESP packets even if a "no NAT" situation is detected. |
| Local firewall | off | on; default: on | Adds necessary firewall rules to allow traffic of this IPsec instance on this device. |
| Remote firewall | off | on; default: off | Adds necessary firewall rules to allow traffic of from the opposite IPsec instance on this device. |
| Compatibility mode | off | on; default: off | Turns on compatibility mode to help deal with a 3rd party remote peer with multiple subnets. |
| Inactivity | integer; default: none | Defines timeout interval, after which a CHILD_SA is closed if it did not send or receive any traffic. |
| Dead Peer Detection | off | on; default: on | A function used during Internet Key Exchange (IKE) to detect a "dead" peer. It used to reduce traffic by minimizing the number of messages when the opposite peer in unavailable and as failover mechanism. |
| Dead Peer Detection: DPD action | Restart | Hold | Clear | None; default: Restart | Controls the use of the Dead Peer Detection protocol where notification messages are periodically sent in order to check the liveliness of the IPsec peer. |
| Dead Peer Detection: DPD Delay | integer; default: none | The frequency of sending R_U_THERE messages or INFORMATIONAL exchanges to peer. |
| Dead Peer Detection: DPD Timeout | integer; default: none | Defines the timeout interval, after which all connections to a peer are deleted in case of inactivity. |
| XAuth identity | string; default: none | The identity/username the client uses to reply to an XAuth request. If not defined, the IKEv1 identity will be used as XAuth identity. |
| Tunnel: Remote source IP | ip; default: none | The internal source IP to use in a tunnel for the remote (right) peer. |
| Tunnel: Local source IP | ip; default: none | The internal (left) source IP to use in a tunnel, also known as virtual IP. |
| Tunnel: Remote DNS | ip; default: none | List of DNS server addresses to exchange as configuration attributes. On the responder, only fixed IPv4/IPv6 addresses are allowed and define DNS servers assigned to the client. |
| Locally allowed protocols | string; default: none | Allowed protocols and ports over connection, also called Port Selectors. Defines in form of 'protocol/port' eg:'17/1701' or '17/%any' or 'udp/l2f'. |
| Remotely allowed protocols | string; default: none | Allowed protocols and ports over connection, also called Port Selectors. Defines in form of 'protocol/port' eg:'17/1701' or '17/%any' or 'udp/l2f'. |
| Custom option | string; default: none | Syntax option = value. Following characters are accepted: a-zA-Z0-9=/_.:{}%\s- |
| Tunnel: Passthrough interfaces | network interfaces; default: none | Network interfaces to include in IPsec Passthrough. |
| Tunnel: Local passthrough subnets | ip/netmask; default: none | IPv4 or IPv6 address/subnet. |
| Tunnel: Remote passthrough subnets | ip/netmask; default: none | IPv4 or IPv6 address/subnet. |
| Flush conntrack | off | on; default: off | Flush conntrack after IPsec makes a successful connection. |
Additional notes:
- Some configuration fields become available only when certain other parameters are selected. The names of the parameters are followed by a prefix that specifies the authentication type under which they become visible. Different color codes are used for different prefixes:
- Red for Type: Tunnel
- Blue for Dead Peer Detection: Enabled
IPsec instance: proposal settings
The proposal settings section is used to configure IKE (Internet Key Exchange) phase 1 & 2 settings.
IKE is a protocol used to set up security associations (SAs) for the IPsec connection.
This process is required before any IPsec tunnel can be established.
It is done in two phases:
| Phase | Mode | |
|---|---|---|
Phase 1
| Main mode (figure 1)
| Aggressive mode (figure 2)
|
Phase 2
| Quick mode
|
| Figure 1 | Figure 2 |
 |  |
Phase 1
| Field | Value | Description |
|---|---|---|
| Encryption algorithm | 3DES | DES | AES 128 | AES 192 | AES 256 | AES 128 CTR | AES 192 CTR | AES 256 CTR | AES128 CCM8 | AES192 CCM8 | AES256 CCM8 | AES128 GCM8 | AES192 GCM8 | AES256 GCM8 | AES128 CCM12 | AES192 CCM12 | AES256 CCM12 | AES128 GCM12 | AES192 GCM12 | AES256 GCM12 | AES128 CCM16 | AES192 CCM16 | AES256 CCM16 | AES128 GCM16 | AES192 GCM16 | AES256 GCM16 | ChaCha20 Poly1305; default: AES 128 | Algorithm used for data encryption. |
| Authentication | MD5 | SHA1 | SHA256 | SHA384 | SHA512 | AESXCBC; default: SHA1 | Algorithm used for exchanging authentication and hash information. |
| DH group | MODP768 | MODP1024 | MODP1536 | MODP2048 | MODP3072 | MODP4096 | MODP8192 | ECP192 | ECP224 | ECP256 | ECP384 | ECP521 | ECP224 BP | ECP256 BP | ECP384 BP | ECP512 BP | Curve25519 | Curve448; default: MODP1536 | Diffie-Hellman (DH) group used in the key exchange process. Higher group numbers provide more security, but take longer and use more resources to compute the key. Must match with another incoming connection to establish IPSec. |
| Force crypto proposal | off | on; default: off | Only chosen proposals will be used when turned on. |
| IKE Lifetime | string; default: none | How long the keying channel of a connection (ISAKMP or IKE SA) should last before being renegotiated. The time is specified in seconds. The s, m, h and d suffixes explicitly define the units for seconds, minutes, hours and days, respectively. |
Phase 2
| Field | Value | Description |
|---|---|---|
| Encryption algorithm | 3DES | DES | AES 128 | AES 192 | AES 256 | AES 128 CTR | AES 192 CTR | AES 256 CTR | AES128 CCM8 | AES192 CCM8 | AES256 CCM8 | AES128 GCM8 | AES192 GCM8 | AES256 GCM8 | AES128 CCM12 | AES192 CCM12 | AES256 CCM12 | AES128 GCM12 | AES192 GCM12 | AES256 GCM12 | AES128 CCM16 | AES192 CCM16 | AES256 CCM16 | AES128 GCM16 | AES192 GCM16 | AES256 GCM16 | ChaCha20 Poly1305; default: AES 128 | Algorithm used for data encryption. |
| Hash algorithm | MD5 | SHA1 | SHA256 | SHA384 | SHA512; default: SHA1 | Algorithm used for exchanging authentication and hash information. |
| PFS group | MODP768 | MODP1024 | MODP1536 | MODP2048 | MODP3072 | MODP4096 | MODP8192 | ECP192 | ECP224 | ECP256 | ECP384 | ECP521 | No PFS; default: MODP768 | The PFS (Perfect Forward Secrecy). Must match with another incoming connection to establish IPSec. |
| Force crypto proposal | off | on; default: off | Only chosen proposals will be used when turned on. |
| Lifetime | string; default: none | How long the keying channel of a connection (ISAKMP or IKE SA) should last before being renegotiated. The time is specified in seconds. The s, m, h and d suffixes explicitly define the units for seconds, minutes, hours and days, respectively. |
PPTP
Point-to-Point Tunneling Protocol (PPTP) is a type of VPN protocol that uses a TCP control channel and a Generic Routing Encapsulation tunnel to encapsulate PPP packets.
PPTP client
A PPTP client is an entity that initiates a connection to a PPTP server. To create a new client instance, go to the Services → VPN → PPTP section and click the 'Add' button:
You should be redirected to the configuration page for the newly added PPTP configuration (choose Role: Client) which should look similar to this:
| Field | Value | Description |
|---|---|---|
| Enable | off | on; default: off | Turns the PPTP instance on or off. |
| Role | Client | Server; default: Client | Choose a role for PPTP instance. |
| Name | string; default: none | Name of the PPTP instance. |
| Server | ip | host; default: none | IP address or hostname of a PPTP server. |
| Username | string; default: none | Username used for authentication to the PPTP server. |
| Password | string; default: none | Password used for authentication to the PPTP server. |
| Client to client | off | on; default: off | Adds route to make other PPTP clients reachable. |
| Default route | off | on; default: off | When selected, this connection will become the device's default route. This means that all traffic directed to the Internet will go through the PPTP server and the server's IP address will be seen as this device's source IP to other hosts on the Internet. |
| MPPE Encryption | None | Stateless | Stateful; default: Stateless | MPPE (Microsoft Point-to-Point Encryption) – a method of encrypting data transferred across connections. |
| MPPE Key length | Selectible: 40 | 56 | 128; default: 128 | Encryption strength for MPPE. |
| Custom options | Selectible: refuse-pap | refuse-eap | refuse-chap | refuse-mschap | noipdefault | noauth | nobsdcomp | nodeflate | idle 0 | maxfail 0 | +Add new; default: all | Custom PPPD (Point-to-Point Protocol Daemon) options are used to configure and manage PPP connections. |
After successful configuration, you can see the status of PPTP clients:
PPTP server
A PPTP server is an entity that waits for incoming connections from PPTP clients. To create a new server instance, go to the Services → VPN → PPTP section and click the 'Add' button:
You should be redirected to the configuration page for the newly added PPTP configuration (choose Role: Server) which should look similar to this:
| Field | Value | Description |
|---|---|---|
| Enable | off | on; default: off | Turns the PPTP instance on or off. |
| Role | Client | Server; default: Client | Choose a role for PPTP instance. |
| Name | string; default: none | Name of the PPTP instance. |
| Local IP | ip; default: 192.168.0.1 | IP address of this PPTP network interface. |
| Remote IP range start | ip; default: 192.168.0.20 | PPTP IP address leases will begin from the address specified in this field. |
| Remote IP range end | ip; default: 192.168.0.30 | PPTP IP address leases will end with the address specified in this field. |
| Timeout | integer; default: none | Time in seconds. If no packets pass through the tunnel between this server and a client, the server will terminate the connection to that client after the amount of time specified in this field passes. |
| Primary DNS | ip; default: none | IP address of the primary DNS server. |
| Secondary DNS | ip; default: none | IP address of the secondary DNS server. |
| Client to client | off | on; default: off | Add route to make other PPTP clients accessible. |
| MPPE Encryption | None | Stateless | Stateful; default: Stateless | MPPE (Microsoft Point-to-Point Encryption) – a method of encrypting data transferred across connections. |
| MPPE Key length | Selectible: 40 | 56 | 128; default: 128 | Encryption strength for MPPE. |
| Custom options | Selectible: proxyarp | encounter | auth | lcp-echo-failure 3 | lcp-echo-interval 60 | default-asyncmap | mtu 1482 | mru 1482 | nobsdcomp | nodeflate | require-mschap-v2 | refuse-chap | refuse-mschap | refuse-eap | refuse-pap | logfd 2 | +Add new; default: all | Custom PPPD (Point-to-Point Protocol Daemon) options are used to configure and manage PPP connections. |
After successful configuration, you can see the status of PPTP server:
The User List section is used to keep authentication settings required to successfully connect to this server. The list is empty by default. Click the 'Add' button to create a new PPTP User:
| Field | Value | Description |
|---|---|---|
| Username | string; default: none | Username used for authentication to this PPTP server. |
| Password | string; default: none | Password used for authentication to this PPTP server. |
| PPTP Client's IP | ip; default: none | Assigns an IP address to the client that uses the adjacent authentication info. This field is optional and if left empty the client will simply receive an IP address from the IP pool defined above. |
Note: there can only be one PPTP Server configuration on the device.
SSTP
Secure Socket Tunneling Protocol (SSTP) is a VPN protocol designed to transport PPP traffic via a secure SSL/TLS channel.
Note: SSTP is additional software that can be installed from the System → Package Manager page.
Note: SSTP is additional software that can be installed from the System → Package Manager page.
SSTP configuration
To create a new SSTP instance, go to the Services → VPN → SSTP section, enter a custom name and click the 'Add' button.
An SSTP instance with the given name will appear in the "SSTP Configuration" list.
To begin configuration, click the 'Edit' button located next to the instance.
Refer to the figure and table below for information on the SSTP instance's configuration fields:
| Field | Value | Description |
|---|---|---|
| Enable | off | on; default: off | Turns the SSTP instance on or off. |
| Server IP address or host name | IPv4/IPv6 | host; default: none | IP address and port (optional, default 443) of the remote SSTP server (e.g., example.com/example or 192.168.1.1/example or [::8a2e:370:7334]/example). |
| User name | string; default: none | Username used for authentication to the SSTP server. |
| Password | string; default: none | Password used for authentication to the SSTP server. |
| Certificate files from device | off | on; default: off | Turn on this option if you want to select generated certificate files from device. |
| CA cert | .crt file; default: none | Upload a Certificate authority (CA) file. |
| Default route | off | on; default: off | When selected, this connection will become the device's default route. This means that all traffic directed to the Internet will go through the SSTP server and the server's IP address will be seen as this device's source IP to other hosts on the Internet. |
| Auth options | Noauth | Refuse-pap | Refuse-eap | Refuse-chap | Refuse-mschap | +Add custom option; default: Noauth |
Stunnel
Stunnel is an open-source a proxy service that adds TLS encryption to clients and servers already existing on a VPN network.
TLS encryption provided by Stunnel can be used as an additional layer of encryption for data sent by VPN.
This procedure increases the security of the established connection and provides higher chances of passing a Deep packet inspection (DPI) check.
Stunnel globals
The Stunnel Globals section is used to manage the Stunnel service as a whole.
Refer to the figure and table below for information on the fields contained in the Stunnel Globals section.
Note: Stunnel is additional software that can be installed from the System → Package Manager page.
Note: Stunnel is additional software that can be installed from the System → Package Manager page.
| Field | Value | Description |
|---|---|---|
| Enabled | off | on; default: off | Turns the Stunnel service on or off. If this is unchecked, Stunnel instances will not start (even if they are enabled individually); therefore, it is necessary to check this field in order to make Stunnel active on the router. |
| Debug Level | integer [0..7]; default: 5 | Debugging to log output level.
|
| Use alternative config | off | on; default: off | Turns the possibility to upload an external Stunnel configuration file on or off.if you turn this on, other Stunnel configurations present in the router will become inactive. |
| Upload alternative config | file; default: none | Uploads an Stunnel configuration file. |
Stunnel instance
To create a new Stunnel instance, go to the Services → VPN → Stunnel section, enter a custom name and click the 'Add' button.
An Stunnel instance with the given name will appear in the "Stunnel Configuration" list.
To begin configuration, click the 'Edit' button located next to the instance.
Refer to the figure and table below for information on the Stunnel instance's configuration fields:
| Field | Value | Description |
|---|---|---|
| Enable | off | on; default: off | Turns the Stunnel instance on or off. |
| Operating Mode | Server | Client; default: Server | Selects the Stunnel instance's role.
|
| Listen IP | ip; default: none | Makes the instance "listen" for incoming connections on the specified IP address. When left empty, the value of this field defaults to localhost (127.0.0.1). |
| Listen Port | integer [0..65535]; default: none | Makes the instance "listen" for incoming connections on the specified TCP port. Make sure you chose a port that is not being used by another service. You will also have to allow traffic on the specified port. |
| Connect IP's | ipv4/ipv6:port; default: none | IP:Port to listen for VPN connections (using 'host_ip:port' convention (e.g., 127.0.0.1:6001 or [::0000:8a2e:0370]:7334).If no host IP is specified only port number, then localhost will be used as a host.) Must contain at least one item. If multiple options are specified, remote address is chosen using a round-robin algorithm. |
| TLS Cipher | None | Secure | Custom; default: None | Packet encryption algorithm cipher. |
| Custom: Allowed TLS Ciphers | string; default: none | A list of TLS ciphers accepted for this connection. |
| Application Protocol | Connect | SMTP | Not specified; default: Not specified | This option enables initial, protocol-specific negotiation of the TLS encryption. The protocol option should not be used with TLS encryption on a separate port. |
| Connect: Protocol Authentication | Basic | NTLM; default: Basic | Authentication type for the protocol negotiations. |
| SMTP: Protocol Authentication | Plain | Login; default: Plain | Authentication type for the protocol negotiations. |
| Store key in TPM | off | on; default: on | When enabled, key will be stored in TPM2 secure storage if space is available. Note: this option is only available on devices with TPM support. |
| Certificate File | .crt file; default: none | TLS client or server certificate file. |
| Private Key | .key file; default: none | TLS client or server key file. |
| Remote server certificate | .crt file; default: none | Certificate file of the remote peer (server) in pem format. |
Additional notes:
- Some configuration fields become available only when certain other parameters are selected. The names of the parameters are followed by a prefix that specifies the authentication type under which they become visible. Different color codes are used for different prefixes:
- Blue for TLS Cipher: Custom
- Dark red for Application Protocol: Connect
- Chocolate for Application Protocol: SMTP
DMVPN
Dynamic Multipoint VPN (DMVPN) is a method of building scalable IPsec VPNs. DMVPN is configured as a hub-and-spoke network, where tunnels between spokes are built dynamically; therefore, no change in configuration is required on the hub in order to connect new spokes.
Note: DMPVN is additional software that can be installed from the System → Package Manager page.
DMVPN configuration
To create a new DMVPN instance, go to the Services → VPN → DMVPN section, enter a custom name and click the 'Add' button. A DMVPN instance with the given name will appear in the "DMVPN Configuration" list.
To begin configuration, click the button that looks like a pencil located next to the instance. Refer to the figures and tables below for information on the DMVPN instance configuration:
| Field | Value | Description |
|---|---|---|
| Enabled | off | on; default: off | Turns the DMVPN instance on or off. |
| Working mode | Spoke | Hub; default: Spoke | Selects the role of this instance
|
| Hub address | ip | host; default: none | IP address or hostname of a DMVPN hub. |
| Field | Value | Description |
|---|---|---|
| Use IPv6 | off | on; default: off | Use IPv6 address to create a tunnel. |
| Tunnel source | network interface; default: Any | Network interface used to establish the GRE Tunnel. |
| Local GRE interface IP address | ip; default: none | IP address of the local GRE Tunnel instance. |
| Spoke: Remote GRE interface IP address | ip; default: none | IP address of the remote GRE Tunnel instance. |
| Hub: Local GRE interface netmask | netmask; default: none | Subnet mask of the local GRE Tunnel instance. |
| GRE MTU | integer; default: 1476 | Sets the maximum transmission unit (MTU) size. It is the largest size of a protocol data unit (PDU) that can be transmitted in a single network layer transaction. |
| Outbound key | integer [0..65535]; default: none | A key used to identify outgoing GRE packets. This value should match the Inbound key value set on the opposite GRE tunnel instance or both key values should be omitted on both sides. |
| Inbound key | integer [0..65535]; default: none | A key used to identify incoming GRE packets. This value should match the Outbound key value set on the opposite GRE instance or both key values should be omitted on both sides. |
| Field | Value | Description |
|---|---|---|
| Local identifier | ip | string; default: none | Defines how the user (IPsec instance) will be identified during authentication.
|
| Remote identifier | ip | string; default: none | Defines how the right participant will be identified during authentication.
|
| Pre-shared key | string; default: none | A shared password used for authentication between IPsec peers. |
| Encryption algorithm | 3DES | AES 128 | AES 192 | AES 256 | AES128 GCM8 | AES192 GCM8 | AES256 GCM8 | AES128 GCM12 | AES192 GCM12 | AES256 GCM12 | AES128 GCM16 | AES192 GCM16 | AES256 GCM16; default: AES 128 | Algorithm used for data encryption. |
| Authentication/Hash algorithm | MD5 | SHA1 | SHA256 | SHA384 | SHA512; default: SHA1 | Algorithm used for exchanging authentication and hash information. |
| DH/PFS group | MODP768 | MODP1024 | MODP1536 | MODP2048 | MODP3072 | MODP4096 | ECP192 | ECP224 | ECP256 | ECP384 | ECP521; default: MODP1536 | Diffie-Hellman (DH) group used in the key exchange process. Higher group numbers provide more security, but take longer and use more resources to compute the key. Must match with another incoming connection to establish IPSec. |
| Force crypto proposal | off | on; default: off | Only chosen proposals will be used when turned on. |
| IKE Lifetime | string; default: none | How long the keying channel of a connection (ISAKMP or IKE SA) should last before being renegotiated. The time is specified in seconds. The s, m, h and d suffixes explicitly define the units for seconds, minutes, hours and days, respectively. |
Note: on some devices, the NHRP parameters are visible after installing the NHRP package from the System → Package Manager page.
| Field | Value | Description |
|---|---|---|
| NHRP network ID | integer; default: 1 | An identifier used to define the NHRP domain. This is a local parameter and its value does not need to match the values specified on other domains. However, the NHRP ID is added to packets which arrive on the GRE interface; therefore, it may be helpful to use the same ID for troubleshooting purposes. |
| NHRP authentication key | string; default: none | A key used in NHRP authentication. |
| NHRP hold time | integer; default: 7200 | Specifies the holding time for NHRP Registration Requests and Resolution Replies sent from this interface or shortcut-target. The hold time is specified in seconds and defaults to two hours. |
| Redirect | off | on; default: off | Enables or disables DMVPN traffic redirection. |
| Hub: NFLOG group | integer [1..65535]; default: none | Specify NFLOG group to be used by NHRP instance |
| Multicast | off | on; default: off | Allow use of dynamic routing protocols that use multicast. |
| NHRP multicast NFLOG group | integer [1..65535}; default: none | Specify NFLOG group to be used by NHRP instance for multicast traffic. |
L2TP
In computer networking, Layer 2 Tunneling Protocol (L2TP) is a tunneling protocol used to support virtual private networks (VPNs). It is more secure than PPTP but, because it encapsulates the transferred data twice, but it is slower and uses more CPU power.
L2TP client
An L2TP client is an entity that initiates a connection to an L2TP server. To create a new client instance, go to the Services → VPN → L2TP section, select Role: Client, enter a custom name and click the 'Add' button. An L2TP client instance with the given name will appear in the "L2TP Configuration" list.
To begin configuration, click the button that looks like a pencil next to the client instance. Refer to the figure and table below for information on the L2TP client's configuration fields:
| Field | Value | Description |
|---|---|---|
| Enable | off | on; default: off | Turns the L2TP instance on or off. |
| Server | ip | host; default: none | A domain name or IP address (IPv4 or IPv6) with an optional port (values from 1 to 65535) is required (e.g., 192.168.1.1, ::0000:8a2e:0370:7334, example.com, or 192.168.1.1:80). |
| Username | string; default: none | Username used for authentication to the L2TP server. |
| Password | string; default: none | Password used for authentication to the L2TP server. |
| CHAP secret | string; default: none | A secret used for L2TP Tunnel Authentication. |
| MTU | [68..9200]; default: none | Sets the maximum transmission unit (MTU) size. It is the largest size of a protocol data unit (PDU) that can be transmitted in a single network layer transaction. |
| Default route | off | on; default: off | When turned on, this connection will become device default route. This means that all traffic directed to the Internet will go through the L2TP server and the server's IP address will be seen as this device's source IP to other hosts on the Internet. |
| Allow CHAP | on | off; default: on | Allows CHAP authentication method to be used. |
| Allow PAP | on | off; default: off | Allows PAP authentication method to be used. |
| Allow MSCHAP-v2 | on | off; default: on | Allow MSCHAP-v2 authentication method to be used. |
| Custom options | string; default: none | Custom pppd (Point-to-Point Protocol Daemon) options are used to configure and manage PPP connections. |
Active L2TP client instance example:
L2TP server
An L2TP server is an entity that waits for incoming connections from L2TP clients. To create a new server instance, go to the Services → VPN → L2TP section, select Role: Server, enter a custom name and click the 'Add' button. An L2TP server instance with the given name will appear in the "L2TP Configuration" list. Only one L2TP server instance is allowed to be added.
A server needs to have a public IP address in order to be available from the public network (the Internet).
To begin configuration, click the button that looks like a pencil next to the server instance. Refer to the figure and table below for information on the L2TP server's configuration fields:
| Field | Value | Description |
|---|---|---|
| Enable | off | on; default: off | Turns the L2TP instance on or off. |
| Use IPv6 | off | on; default: off | L2TPv6 support package is required to enable this option. Enables an IPv6 socket to accept L2TP connections over IPv6. Note: L2TPv6 support is additional software on some devices that can be installed from the System → Package Manager page. |
| Local IP | ip; default: 192.168.0.1 | IP address of this L2TP network interface. |
| Remote IP range begin | ip; default: 192.168.0.20 | L2TP IP address leases will begin from the address specified in this field. |
| Remote IP range end | ip; default: 192.168.0.30 | L2TP IP address leases will end with the address specified in this field. |
| Port | integer [1..65535]; default: none | Port for binding. |
| Enable CHAP | on | off; default: off | Challenge-Handshake Authentication Protocol for L2TP. |
| CHAP Secret | string; default: none | A secret used for L2TP Tunnel Authentication. |
| CHAP authentication | on | off; default: on | When turned on it requires CHAP authentication method to be used, when turned off it refuses CHAP authentication method. |
| PAP authentication | on | off; default: off | When turned on it requires PAP authentication method to be used, when turned off it refuses PAP authentication method. |
| MSCHAP-v2 authentication | on | off; default: on | When turned on it requires MSCHAP-v2 authentication method to be used, when turned off it refuses MSCHAP-v2 authentication method. |
| Custom options | string without "`" or "'"; default: | Custom pppd (Point-to-Point Protocol Daemon) options are used to configure and manage PPP connections. |
| Field | Value | Description |
|---|---|---|
| User name | string; default: user | Username used for authentication to this L2TP server. |
| Password | string; default: pass | Password used for authentication to this L2TP server. |
| L2TP Client's IP | ip; default: none | Assigns an IP address to the client that uses the adjacent authentication info. This field is optional and if left empty the client will simply receive an IP address from the IP pool defined above. |
Active L2TP server instance example:
L2TPv3
L2TPv3 (Layer Two Tunneling Protocol Version 3) is a point-to-point layer two over IP tunnel. This means you can tunnel L2 protocols like Ethernet, Frame-relay, ATM, HDLC, PPP, etc. over an IP network.
To create a new L2TPv3 instance, go to the Services → VPN → L2TPv3 section, enter a custom name and click the 'Add' button. You will be redirected to instance configuration page and L2TPv3 instance with the given name will appear in the "L2TPv3 Configuration" list.
Instance configuration
| Field | Value | Description |
|---|---|---|
| Enable | off | on; default: off | Turns the L2TPv3 instance on or off. |
| Local address | ip; default: none | WAN or LAN interface IPv4 or IPv6 address. |
| Tunnel ID | integer [1..4294967295]; default: none | ID of tunnel is specified from 1 to 4294967295. The value used must be unique between instances and match the peer tunnel ID value being used at the peer. |
| Session ID | integer [1..4294967295]; default: none | ID of peer's session is specified from 1 to 4294967295. The value used must be unique between instances match the tunnel ID value being used at the peer. |
| Cookie | hexidecimal form with specific length [8,16]; default: none | Must be specified in hexidecimal form and be length of 8 or 16 (eg.: 89ABCDEF). |
Peer settings
| Field | Value | Description |
|---|---|---|
| Peer address | ip | hostname; default: none | Peer endpoint IP address or domain name. |
| Peer Tunnel ID | integer [1..4294967295]; default: none | ID of peer's tunnel is specified from 1 to 4294967295. It must match other end tunnel ID. |
| Peer Session ID | integer [1..4294967295]; default: none | ID of peer's session is specified from 1 to 4294967295. It must match other end session ID. |
| Peer Cookie | hexidecimal form with specific length [8,16]; default: none | Must be specified in hexidecimal form and be length of 8 or 16. eg.: 89ABCDEF. It must match other end Cookie. |
Instance Settings
| Field | Value | Description |
|---|---|---|
| Bridge to | None | LAN; default: None | Peer Endpoint IP address. |
| IPv4 Address | IPv4; default: none | IP address of standalone L2TPv3 interface. |
| IPv6 Address | IPv6; default: none | IPv6 address of standalone L2TPv3 interface. CIDR notation: address/prefix. |
| Netmask | netmask; default: none | Netmask of standalone L2TPv3 interface. |
| MTU | integer [64..9000]; default: none | Sets the maximum transmission unit (MTU) size. It is the largest size of a protocol data unit (PDU) that can be transmitted in a single network layer transaction. |
| Encapsulation | IP | UDP; default: IP | Specify technology to use when connecting to other end. |
| Layer 2 specific header type | None | Linux Default; default: Linux Default | It might be neccessary to set this option to none when using other hardware. |
ZeroTier
ZeroTier One is an open source software which can establish Peer to Peer VPN (P2PVPN) connection between various devices running various operating systems. It also provides network management possibilities such as routing and creating firewall rules.
Note: ZeroTier is additional software that can be installed from the System → Package Manager page.
In order to create a new ZeroTier Instance, look to the Add New ZeroTier Configuration section; enter a custom name and click the 'Add' button:
You should be redirected to the configuration page for the newly added ZeroTier Instance which should look similar to this:
| Field | Value | Description |
|---|---|---|
| Enabled | off | on; default: off | Turns the ZeroTier Instance on or off. |
ZeroTier network configuration instance should look similar to this:
| Field | Value | Description |
|---|---|---|
| Enabled | off | on; default: off | Turns the ZeroTier Instance on or off. |
| Port | integer [0..65535]; default: 9993 | ZeroTier Network port. |
| Network ID | hex string; default: none | ZeroTier Network ID. Log in to your ZeroTier account in order to locate the ZeroTier Network ID, which should be a string of hexadecimal characters. |
| Bridge to | None | LAN; default: None | Specify to which interface this ZeroTier instance should be bridged to. |
| Allow default route | off | on; default: off | Allows ZeroTier to override system default route. |
| Allow global IP | off | on; default: off | Allows ZeroTier managed IPs and routes to overlap public IP space. |
| Allow managed IP | off | on; default: on | Assigns ZeroTier managed IPs and routes. |
| Allow DNS | off | on; default: off | Applies DNS servers that are set at the network controller. |
| Custom planet file | -(interactive button) | Custom planet file contains user-defined roots, enabling the use of private root servers. |
WireGuard
WireGuard is simple, fast, lean, and modern VPN that utilizes secure and trusted cryptography.
It intends to be more performant than OpenVPN. WireGuard is designed as general purpose VPN, fit for
many different circumstances and while it is currently under heavy development, it already
might be regarded as the most secure, easiest to use, and simplest VPN solution.
WireGuard works by adding an interface which acts as a tunnel. To create one enter its name and click the Add button. This should add a new Wireguard instance and open a configuration window.
General Instance Settings
This section contains General settings of created WireGuard Instance. Here you can find its Public and
Private keys and generate them, specify Port and IP addresses for communication.
| Field | Value | Description |
|---|---|---|
| Enable | off | on; default: off | Turns WireGuard Instance on or off. |
| Private Key | string; default: - | Private Key used in authentication. |
| Public Key | string; default: - | Public Key used in authentication. |
| Generate key pair | -(interactive button) | Click to generate Public Key and Private Key. |
| IP Addresses | ip; default: 10.5.0.1/24 | A single IP address or a list of them for this instance associated with public keys. |
Advanced Settings
Advanced Settings section contains Metric and MTU configuration for this WireGuard interface.
| Field | Value | Description |
|---|---|---|
| Metric | positive integer; default: none | Specify (Optional) metric for this tunnel interface. Lower number means higher priority. |
| Listen port | integer [1..65535]; default: 51820 | Required. UDP port used for outgoing and incoming packets. |
| MTU | integer [68..9200]; default: none | Maximum Transmission Unit of tunnel interface. Range [68 to 9200]. If not specified, the MTU is automatically determined by physical interface MTU value. |
| DNS servers | ip; default: none | DNS server(s) for this Wireguard interface. |
| Watchdog interval | integer [0..60]; default: none | Optional. Interval in minutes to re-resolve hostnames for inactive WireGuard peers if domain is used. If not specified and domain is used, hostnames will be checked every minute. |
Peers
The Peers section is used to create and configure all the peers for this interface. To create one enter its name and click the Add button.
General Peer Settings
In the General section of Peer instance you can configure basic information about the endpoint to allow communications.
| Field | Value | Description |
|---|---|---|
| Public Key | string; default: none | Base64-encoded public key of peer. |
| Endpoint host | domain name | ip; default: none | Host of peer. Names are resolved prior to bringing up the interface. |
| Allowed IPs | ip; default: 10.5.0.2/32 | IP addresses and prefixes that this peer is allowed to use inside the tunnel. Usually the peer's tunnel IP addresses and the networks the peer routes through the tunnel. |
| Description | string; default: none | Description of the peer. |
| Route Allowed IPs | off | on; default: off | Create routes for Allowed IPs for this peer. |
Advanced Peer Settings
In the Advanced section of Peer instance you are able to configure additional
settings such as its Description, Endpoint Host and Port, Preshared Key and other.
See more information below.
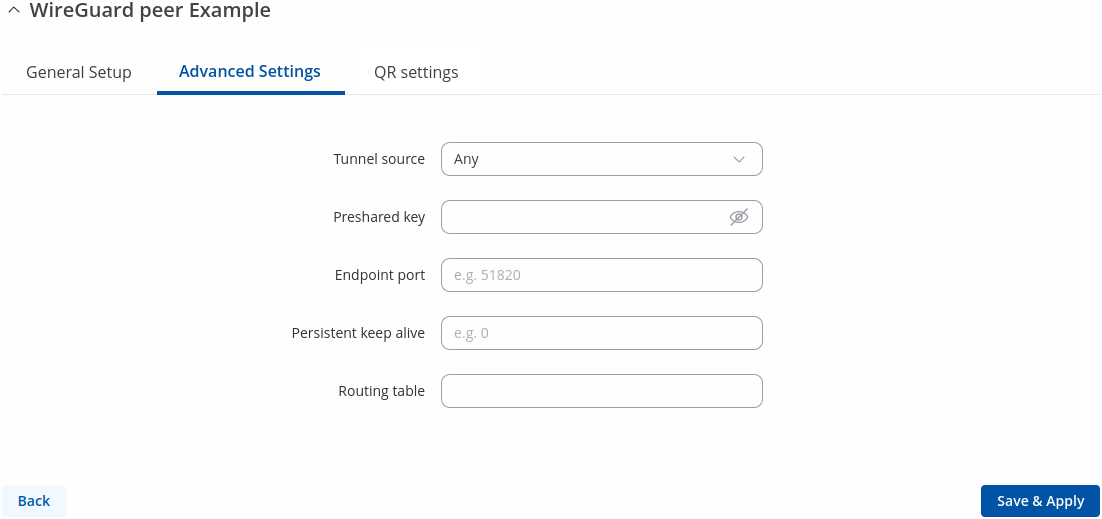
| Field | Value | Description |
|---|---|---|
| Tunnel source | Any | LAN | WAN | Mobile; default: Any | Interface to bind this instance to. |
| Tunnel source mode | Prefer | Persist; default: Prefer | Choose whether to persist or prefer the connection on the selected interface. |
| Pre-Shared Key | string; default: none | Base64-encoded pre-shared key. Adds in an additional layer of symmetric-key cryptography for post-quantum resistance. |
| Endpoint Port | integer [1..65535]; default: none | Port of peer. |
| Persistent Keep Alive | integer [0..65535]; default: none | Seconds between keep alive messages. Default is 0 (disabled). Recommended value if this device is behind a NAT is 25. Range [0 to 65535]. |
| Routing table | string; default: none | Defines which routing table to use for this peer routes, not necessary to configure for most setups.. |
QR Settings
| Field | Value | Description |
|---|---|---|
| Server IP | IP address; default: None | Specifies which interface's IP address should be bound to the hostname. |
| Tunnel address | IP; default: 10.5.0.2/32 | Choose whether to persist or prefer the connection on the selected interface. |
| Peer allowed IPs | All IPv4 | All IPv6 | LAN; default: All IPv4 (0.0.0.0/0) | Required. IP addresses and prefixes that this peer is allowed to use inside the tunnel. Usually the peer's tunnel IP addresses and the networks the peer routes through the tunnel. |
| QR code | Interactive button | Generates single-use QR code. |
Tinc
Tinc is a Virtual Private Network (VPN) daemon that uses tunnelling and encryption to create a secure private network between hosts on the Internet. Tinc is Free Software and licensed under the [General Public License] version 2 or later. Because the VPN appears to the IP level network code as a normal network device, there is no need to adapt any existing software. This allows VPN sites to share information with each other over the Internet without exposing any information to others.
Note: Tinc VPN is additional software that can be installed from the System → Package Manager page.
Tinc works by adding an interface which acts as Router/Switch/Hub mode. To create one enter its name and click the Add button. This should add a new Tinc interface and open a configuration window
General Interface Settings
This section contains General settings of created Tinc Interface. Here you can find its Public and
Private keys, specify Subnet and Host to Connect to for communication.
| Field | Value | Description |
|---|---|---|
| Enable | off | on; default: off | Turns Tinc Interface on or off. |
| Local tunnel endpoint IP | ipv4 with or without mask; default: none | IP address of virtual local network interface. |
| Local tunnel endpoint IPv6 | ipv6 with or without mask; default: none | IPv6 address of virtual local network interface. |
| Subnet | ip with subnet; default: none | Subnets that peers are allowed to access. You can add multiple subnet entries for each daemon. |
| Private Key | .key file; default: none | Generated RSA private key. |
| Public Key | .key file; default: none | Generated RSA public key. |
| Host to Connect to | Not specified | Host name; default: Not specified | Specifies which other tinc daemon to connect to on startup. Multiple variables may be specified, in which case outgoing connections to each specified tinc daemon are made. |
Advanced Settings
Advanced Settings section.
| Field | Value | Description |
|---|---|---|
| Port | integer [1..65535]; default: 655 | Configure the port on which this tinc daemon will listen for incoming connections. |
| Address Family | Any | IPv4 | IPv6; default: Any | This option affects the address family of listening and outgoing sockets. |
| Bind To Address | ip; default: none | Addresses for Tinc VPN to use for listening sockets. |
| Bind To Interface | Any | LAN | WAN | WAN6 | Mobile; default: Any | Interface to listen for incoming connections. |
| Key Expire | integer; default: 3600 | This option controls the time the encryption keys used to encrypt the data are Valid. |
| Mode | Router | Switch | Hub; default: Router | This option selects the way packets are routed to other daemons. |
| Ping Interval | integer; default: 60 | The number of seconds of inactivity that tinc will wait before sending a probe to the other end. |
| Ping Timeout | integer; default: 5 | The number of seconds to wait for a response to pings or to allow meta connections to block. If the other end doesn't respond within this time, the connection is terminated, and the others will be notified of this. |
Hosts
The Hosts section is used to add your VPN hosts.
To create one enter its name and click the Add button.
To configure it click the Edit  button.

General Tinc Host Settings
In the General section of Hosts instance you can configure basic information about the host.
| Field | Value | Description |
|---|---|---|
| Enable | off | on; default: off | Turn this tinc host on/off. |
| Description | string; default: none | Optional. Description of host. |
| Address | IP addresses with an optional port number; default: none | Remote host's IP address or domain name, optionally followed by a port number (e.g., example.com:8080). If no port is specified, the default port (655) will be used. |
| Subnet | IPv4, IPv6 or MAC addresses; default: none | Specify the host-side subnets you need to access. You can add multiple subnet entries for each daemon. |
| Public Key | .key file; default: none | Generated RSA public key. |
EoIP
EoIP is a MikroTik RouterOS protocol based on GRE RFC 1701 that creates an Ethernet tunnel between two routers on top of an IP connection. At current moment it is easiest way to create stateless tunnel with Mikrotik.
Note: EoIP is additional software that can be installed from the System → Package Manager page.
Topology
EoIP configuration
To create a new EoIP instance, go to the Services → VPN → EoIP page and click the 'Add' button. The "EoIP Configuration" window will appear.
The following is the instance configuration window:
| Field | Value | Description |
|---|---|---|
| Enable | on | off; default: off | Enable current configuration. |
| Name | string; default: instance1 | Name of the EoIP instance. |
| Tunnel ID | integer [1..65536]; default: empty | Unique tunnel identifier, which must match other side of the tunnel. |
| Use IPv6 | on | off; default: off | The parameter specifies the local IP address used as the source for sending traffic through a tunnel. |
| Local IP | IPv4/IPv6 addresses; default: empty | The parameter specifies the local IP address used as the source for sending traffic through a tunnel. |
| Dynamic | on | off; default: off | Allow the connection. If you enable it, be aware that there is no authorization and it is not secure. Avoid using this feature on a public IP or a network where you do not have full control over all hosts. |
| Remote IP | IPv4/IPv6 addresses; default: empty | The parameter specifies the IP address of the remote endpoint that the tunnel will connect to. |
| Bridge | interface; default: none | Assign an EoIP interface to a bridge. |
| MTU | integer [68..9200]; default: none | MTU for the tunnel interface. |